The Complete Guide to Chromebook Parental Controls
Special note related to anyone in a virtual learning situation:
- If using an Android device, you can use both their Google Classroom school account and their personal Gmail account on the Android device at the same time. AND, Family Link on the Android device will monitor both accounts. This is also true on Chromebooks where you can make a Google Classroom school account act as a secondary account and it can obey the Family Link screen time controls (the school Google Classroom “rules” should still control filtering and block certain websites, like social media, according to the school’s set-up).
- Zoom is an extension for the Chrome browser on a Chromebook. Normally, Family Link doesn’t allow extensions, but Google changed Family Link to allow a short list of extensions, including Zoom and a printer extension. You can read more here.
- Alternatively, if the extension still won’t add, the only way to use Zoom or any other video-sharing extension on a Chromebook is to create a new Gmail account and use this new Google account on the Chromebook without Family Link.
PARENTS – keep reading. There’s a lot to understand about Chromebooks. Ask us any questions you’re left with by joining our private group for like-minded parents, called The Table (more info at the end of this post) or email: info@wptemp.protectyoungeyes.com.
SCHOOLS – If you’re a school administrator reading this and you have questions about Chrome device resources for schools or GSuite settings, here are Google’s helpful resources all in one place:
- Manage policies for Chrome devices
- Manage GSuite settings, including: Hangouts chat history, disabling Gmail confidential mode, deciding which apps to allow, disabling access to “Guest Mode, turning off certain GSuite services, and restricting email correspondence between certain individuals.
We believe there are multiple layers that should be in place in order to adequately protect a Chromebook.
5 Layers of Chromebook protection (click each to head straight to the one you want, but addressing them in sequence is helpful):
- Layer 1: Guard the location of the Chromebook.
- Layer 2: Love your WiFi (router)!
- Layer 3: Set-up the Chromebook correctly.
- Layer 4: Use clean DNS on the Chromebook.
- Layer 5: Try to use Family Link.
Note – each of these 5 layers apply to BOTH School-owned and personal Chromebooks. We’ll do our best to explain how each layer impacts each type of Chromebook.
Layer 1: Guard the location of the Chromebook.
Remember, where kids use technology often dictates how they use their technology. We have strong opinions about controlling where kids use their tech. For example, let’s keep all internet-ready devices out of bedrooms at night, where kids take more risks, and sleep is constantly interrupted. Daytime Chromebook usage in bedrooms might be totally necessary during virtual school, since the bedroom might be a child’s learning space, too.
But even if they don’t use it for something that dangerous, many kids have been known to hide devices under the covers and play games late into the night. With games like Minecraft (now on Chromebooks) and hidden internet browser games, it’s so important to keep devices out of bedrooms at night.
Just know that the combination of boredom, bedrooms, and darkness (the Toxic Trio – watch the webinar!) can be tempting spots to make bad digital choices (whether you’re 14 or 40 years old!).
Related post: The 5 Worst Places for a Kid to be Online
Layer 2: Love your WiFi (router)!
The Router is the most important digital hardware in the house! And, it’s often the most ignored. We joke that routers are the social distance champion of technology. But, get this part of your internet safety plan correct! You are responsible for every digital click on your home’s network, so be sure to control the router.
Popular options for parents are:
- Gryphon router. We have really enjoyed the Gryphon. Top-notch set of parental controls. This is the router used by our CEO, Chris, with his four children. It gives you time control, YouTube Restricted Mode, and more. Easy set-up and a parent app that allows you to pause the internet with one touch.
- Alternatively, if you love your current router, but simply want to exert more control over it, then we recommend Bark Home. It connects to your router, giving you stronger parental controls over your home’s network. It’s not a router, but connects to your router. Easy-to-use app for you to exert screen time and app control over your kid.
**Bonus content – we tested the best routers out there and here’s WHY we picked Gryphon.
Whether you’re dealing with a School-owned or personal Chromebook, the router is KEY.
Further explanation about G Suite accounts – kids are given a school email to log into their Chromebook. This school email is connected to the School’s Google Suite which allows the school to control a lot of features, including blocking social media, known porn domains, etc. Whether the child is connected to your router at home or the WiFi at a friend’s house, if they log in with their school email, it will obey those School Google Suite “rules.”
The issue arises when the Chromebook allows “guests” to use the Chromebook, with Gmail accounts that DO NOT obey any rules. Chromebook ownership is covered in Layer 3. Keep going! You got this!
Layer 3: Set up the Chromebook correctly.
This is the step where differences between School-owned and personal Chromebooks are important.
If you have a school-owned Chromebook:
Determine the owner of the Chromebook.
It’s likely that the School has set themselves up as the owner of the device. This means that the School has ultimate control over the device. This could be good or bad. But, how do you determine whether or not the School is the owner?
#1 – Watch this video. If you see “These settings may only be modified by the owner,” as you see in the video, then it probably means the School is the owner. I suggest sending an email to the IT person in order to confirm that yes, the School is the owner of the device.
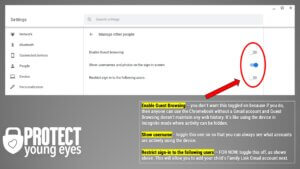
#2 – If the school is the owner, then we need to ensure that the school has turned off “Enable Guest browsing.” In the video, you’ll see that it’s toggled ON (which is what we don’t want). Otherwise, anyone with a Gmail account can use the device. This is where you contact the school and request that they have this toggled off.
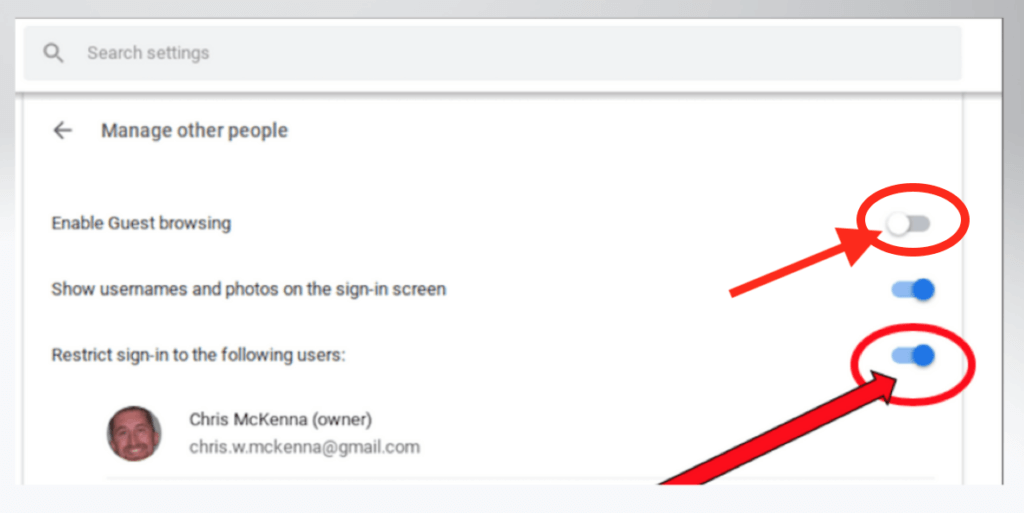
This next screenshot shows you what we want to see – “Enable Guest browsing” toggled off and “Restrict sign-in” toggled ON with only the Gmail accounts that you want using the device.
Again, if the School is the owner and either of these toggles aren’t as shown below, it’s time to contact the school and ask questions.
If you have a personal Chromebook:
Make a Parent the OWNER of the Chromebook. The first user to set up the Chromebook becomes the “owner” of the Chromebook and can set up special privileges. This is similar to being the “admin” for a Windows environment.
A parent should be the “owner.” If a student is set up as the owner, and a parent wants to change this, perform a factory reset (Powerwash) and start over with the set-up process. No harm.
Turn off GUEST BROWSING on the Chromebook. The “owner” should turn off guest browsing. This is important because Chromebooks don’t maintain web history for guest browsing, making it easy to conceal web activity.
How do I turn off guest browsing on a Chromebook? (again, if the school is the owner, they only they can toggle off Guest browsing):
- Sign in as the owner.
- In the lower right corner, click where the time is.
- Click the gear icon (Settings).
- Look for the section labeled “People” and click “Manage other people”
- Ensure “Enable Guest browsing” is toggled off, “Show usernames…” is toggled on, and “Restrict sign-in to the following users” is toggled off TEMPORARILY (“toggled on” means it’s blue, like the image below). See image:
Note: If you don’t limit guest browsing, then anyone can use the internet by clicking the “Browse as Guest” icon in the lower left. Not only that, but the Chromebook won’t maintain web history. It’s like using the device in Incognito mode, where activity can be hidden. Also, the “Restrict sign-in to the following users” being toggled off is just temporary so that you can add your child’s Family Link Gmail account below.
By completing these steps in Layer 3, you’re making sure that only the right people can access the Chromebook and make changes to the Chromebook.
Layer 4: Use clean DNS on the Chromebook.
Maybe you’ve already set up Gryphon or another router with parental controls. That’s great.
But, if you don’t have a router with parental controls, you’ll want to set up clean DNS on the device (please, please consider purchasing a Gryphon – it’s that good).
Whether you have a school-owned or personal device, forcing clean DNS on all of the WiFi networks that the Chromebook might use is a great “belt and suspenders,” double-layer of protection. That way, even if for some reason a guest Gmail account is using the device, it will be subject to porn blocking from the clean DNS.
Clean DNS is like a porn-blocking insurance policy for the Chromebook.
If you haven’t done so, please read How to Block Porn on Any Device. For Free! for a recap of what clean DNS is.
How do I set up clean DNS on my Chromebook?
- Click the profile in the lower right corner (where the battery life and time are).
- Click the gear symbol (Settings).
- Click the arrow to the right of the home WiFi you’re connected to.
- That should list all of the WiFi signals the Chromebook is picking up. Again, click the arrow to the right of your home network (if you’re at home – or whatever network you want to apply clean DNS to).
- Click the down arrow next to “Network.”
- This should open up some options, one called “Name servers.”
- Click the radial button next to “Custom name servers.”
- Click the line that appears under that and type this: 185.228.168.168 (on the first line) and 185.228.169.168 (on the second line). These are the clean DNS address for CleanBrowsing, a service we trust.
- Then click the back arrow at the top, next to your WiFi name.
- Then “X” out of the settings in the upper right of the blue box.
Here’s a video of those steps:
Note: You’ll need to follow these steps for each WiFi network used on the Chromebook. That should redirect all of your internet traffic through that CLEAN name server, preventing access to most junk. Unfortunately, there’s no way to lock in these clean DNS settings, but they’re obscure enough that most kids don’t know to go look for them.
Layer 5: Try to use Family Link.
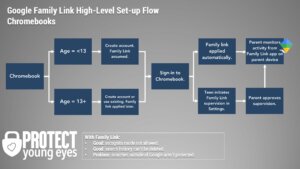
This high-level flowchart shows what steps are needed to set-up Family Link on a Chromebook for the NON school email accounts:
How do I set up Family Link on a Chromebook?
The sequence is important. It looks like an overwhelming list, but you can do this! One step at a time.
- Download the Family Link app on your own smartphone or tablet (it’s available for both iOS or Android).
- If your child doesn’t have a Gmail account yet -> create a new Gmail account from some computer. If your child already has a Gmail account, then skip to step 4. If your child is <13 years old (in the United States – note that different countries have different ages that signal digital adulthood), then a parent will have to perform certain verification steps.
- ***NOTE – if you are a parent with an iPhone, and you downloaded the Family Link app, DO NOT attempt to create the Family Link Gmail account for your child through the iOS app. Eventually, you’ll run into a dead end, where the app will give you a 9-digit code, like XXX-xxx-XXX, and ask you to link it to a device. Unfortunately, there’s no place to type that 9-digit code into a Chromebook. It’s a dead end we’ve brought up with Google in multiple support threads, and no one, including “Google Experts” knows how to solve this. Stick with creating a Gmail account outside of iOS by following these instructions.
- If the child is <13, sign-in to the Chromebook with the new child (<13) Gmail account you just created. If the child is <13, then Google will ask for parent permission for the child to sign in. After you’ve logged in the child’s account, you should see a little Family Link kite icon in the lower right corner.
- If the child’s Gmail account is for age 13+:
- Click the lower, right corner where the time is.
- Click the gear for Settings.
- Scroll down to “People” and “Parental controls” where you’ll see a button to begin the Family Link process.
- Have the teen follow the steps to allow a parent or caring adult to supervise their account.
- From the parent Family Link app, start at the top and work your way down.
- In settings, “safe search” (Google) and “block mature sites” (Chrome) are set by default. This is good, but click around. Note: if a child tries to visit a blocked URL, they will get a block page, and you will receive a notification in the Family Link app. It’s a nice feature.
- For example, “Location” is at the top, and you can use Family Link to keep track of where your child is.
- Under “Screen Time,” you may want to set limits for school or bedtime hours.
- Notice that you can check on what apps have been downloaded.
- Block porn: Even with CleanBrowsing in place, there are a few problematic search engines: www.aol.com and www.ecosia.org. Add them to Settings -> Chrome -> Manage Sites -> Blocked (we’re trying to have CleanBrowsing block these with the Family IP).
- Go back and Restrict Users: back in Layer 3, step 5 above, we told you that we were only temporarily allowing any accounts to be added to the Chromebook. Now that you’ve added your child’s Family Link account, you now want to toggle ON the “Restrict Users” feature so that only an approved list of people can use the device. See the image here:
Note: Family Link alone is not adequate for removing explicit content from device. This is why we push CleanBrowsing so heavily.
If you don’t use CleanBrowsing, and you want to block explicit content, you’ll need to add every non-Google search engine to: Family Link App -> “Settings” -> “Filters on Google Chrome” -> “Manage Sites” -> blocked list. Otherwise, pornography is very easy to access.
Chromebook Parent FAQ’s
Q: My kid uses a Chromebook for school with a school email to login. Can I use Family Link on that school account so that I can monitor what my kid is doing?
A: As of August 11, YES!
You can now make a Google Classroom school account act as a secondary account and it can obey the Family Link screen time controls (the school Google Classroom “rules” should still control filtering and block certain websites, like social media, according to the school’s set-up). These are copied from Google’s support article:
Add a school account as a secondary account
- On your Chromebook, sign in to your child’s personal Google account managed by Family Link
.
- At the bottom right, select the time.
- Select Settings
.
- On the left, select People.
- Select your child’s personal Google account managed by Family Link
.
- Next to “Accounts,” select Add school account.
- Follow the on-screen steps. To approve the addition of a school account, a parent will need to give permission.
Important: If you add a school account as a new user on your Chromebook’s sign-in screen, Family Link parental controls will not apply to that user account.
Q: Are any other parental controls needed on the Chromebook?
It depends on your situation. There are 3 that we recommend:
1. Mobicip has a Chromebook filtering extension, and it works very well, in addition to providing service on other devices. Therefore, some parents like having one solution for all devices. It’s very reasonably priced ($39.99/year for the whole family.
2. Bark is an amazingly versatile tool that can be connected to a kid’s email account, social media, iMessage (iPhones) to identify troubling words and phrases. It works on iPhones, Chromebooks, and Androids. Awesome pricing for what it does (and PYE families love it) – $99/year for algorithm monitoring and $49/year for porn blocking and time controls.
3. A9 is a FREE extension that does much of what Mobicip does, but it only works on Chromebooks. We really like it and know its founder, a dad who creates awesome tools to protect families and then gives them away for free. That’s a mission we LOVE. Check it out today!
Q: I’m concerned about my kid’s privacy on the Chromebook. Especially with the school monitoring. How can I protect it?
A: Read these:
- Article #1 – enhancing student privacy at the Chromebook (device) level.
- Article #2 – enhancing student privacy at the Google Apps for Education (GAFE) account level.
Q: Can I use both Family Link and Bark or Mobicip at the same time on the Chromebook?
A: Yes! As of May 2020, all Google Store extensions can be used on accounts managed by Family Link. And Mobicip and Bark are Chrome extensions. But parents will have to approve the extension.
Q: Can my child use YouTube while Family Link is enabled?
A: Only if the Gmail account being monitored by Family Link is >13 years old. If <13, then they will have some options, including YouTube Kids, Explore (generally aligns with content ratings for viewers 9+), Explore More (13+), or Most of YouTube (what it says). These additional content levels were added in March 2021.
Q: Can I delete my child’s Family Link account at any time?
A: Yes! Just tap the 3 dots in the upper, right corner of Virginia’s screen in your Family Link app, tap “Account info,” then tap “Delete Account.”
What if I have more questions? How can I stay up to date?
Two actions you can take!
- Subscribe to our tech trends newsletter, the PYE Download. About every 3 weeks, we’ll share what’s new, what the PYE team is up to, and a message from Chris.
- Ask your questions in our private parent community called The Table! It’s not another Facebook group. No ads, no algorithms, no asterisks. Just honest, critical conversations and deep learning! For parents who want to “go slow” together. Become a member today!
*There are affiliate links throughout this post because we’ve tested and trust a small list of parental control solutions. Our work saves you time! If you decide that you agree with us, then we may earn a small commission, which does nothing to your price. Enjoy!

